German Fried Potatoes (Bratkartoffeln)

Ingredients:

  • 2 lbs (about 1 kg) yellow potatoes (boiled and cooled)
  • 1 medium onion, thinly sliced
  • 2–3 tbsp oil or bacon fat
  • Salt and black pepper, to taste
  • Optional: chopped parsley or chives, for garnish
  • Optional: 4 slices bacon, chopped (for a smokier flavor)

Instructions:

1. Prep the Potatoes:

  • Boil whole potatoes (skin on) in salted water until just tender, about 15–20 minutes.
  • Let them cool completely (best to boil them a day ahead).
  • Peel and slice into ¼-inch thick rounds.

2. Fry the Bacon (if using):

  • In a large skillet (preferably cast iron), cook chopped bacon over medium heat until crisp.
  • Remove bacon and set aside. Leave fat in the pan.

3. Fry the Onions:

  • Add sliced onions to the skillet with a bit of oil if needed.
  • Sauté until golden and soft. Remove and set aside.

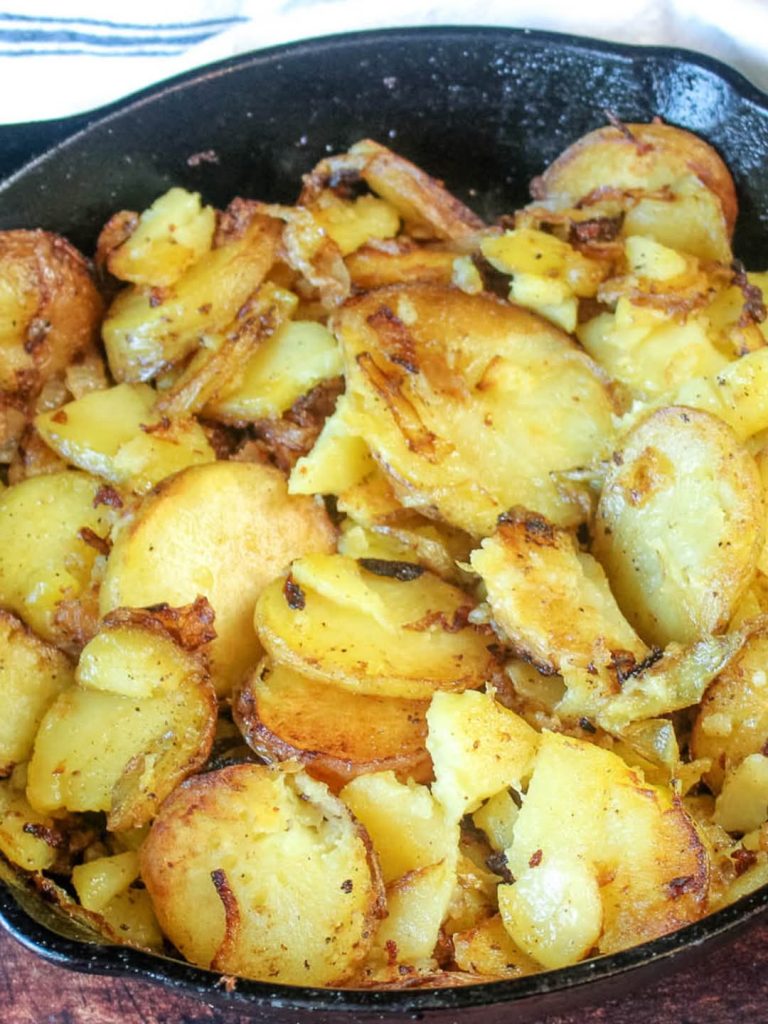
4. Fry the Potatoes:

  • Add a bit more oil to the pan if necessary.
  • Spread the sliced potatoes in a single layer. Fry undisturbed for 3–4 minutes until golden and crispy.
  • Flip and fry the other side. Repeat in batches if needed for better crispiness.

5. Combine & Serve:

  • Add onions (and bacon, if used) back to the pan.
  • Season with salt and pepper. Toss gently and cook another 2–3 minutes.
  • Garnish with chopped parsley or chives.

Delicious and Easy Croissants Recipe

Classic Croissants Recipe

Ingredients (Makes about 12 croissants)

For the Dough:

4 cups (500g) all-purpose flour

1/2 cup (100g) sugar

2 1/4 tsp (1 packet) active dry yeast

1 tsp salt

1 1/4 cups (300ml) warm milk

2 tbsp (30g) unsalted butter, melted

For the Butter Block (Beurrage):

1 1/2 cups (340g) unsalted butter (cold but pliable)

For Egg Wash:

1 egg

1 tbsp milk


Instructions

  1. Make the Dough (Détrempe):

In a large bowl, combine warm milk and yeast. Let sit 5–10 minutes until frothy.

Add sugar, melted butter, flour, and salt. Mix until a dough forms.

Knead for about 5 minutes until smooth. Cover and refrigerate for 1 hour.

  1. Make the Butter Block:

Place butter between two sheets of parchment and pound/roll into a 7-inch square. Chill until firm but pliable.

  1. Laminate the Dough:

Roll the chilled dough into a 10-inch square.

Place butter block in the center, folded like an envelope (butter fully encased).

Roll dough into a rectangle (about 8×24 inches), then fold into thirds like a letter. This is your first “turn.”

Chill for 30 minutes. Repeat this rolling and folding process two more times, chilling between each turn.

  1. Shape the Croissants:

Roll the dough into a large rectangle (about 8×36 inches).

Cut into long triangles (base about 4 inches wide).

Roll each triangle from the base to the tip, slightly stretching it, and curl the ends to form the croissant shape.

Place on baking sheet lined with parchment. Cover and let rise 1.5 to 2 hours until puffy.

  1. Bake:

Preheat oven to 400°F (200°C).

Mix egg and milk for egg wash. Brush each croissant.

Bake 15–20 minutes or until golden brown.

Creamy Garlic Parmesan Chicken with Cheesy Twisted Pasta

Ingredients

For the Chicken:

2 large chicken breasts (sliced in half horizontally or 4 chicken cutlets)

Salt and black pepper to taste

1 tsp garlic powder

1 tsp Italian seasoning

2 tbsp olive oil

2 tbsp butter

4 cloves garlic (minced)

1 cup heavy cream

½ cup chicken broth

¾ cup grated Parmesan cheese

½ cup shredded mozzarella (optional for extra cheesiness)

Chopped parsley (for garnish)

For the Twisted Pasta:

12 oz rotini or fusilli pasta

1 tbsp butter

½ cup milk

1 cup shredded cheddar cheese

½ cup mozzarella cheese

Salt to taste


Instructions

  1. Prepare the Pasta:

Cook pasta in salted water according to package instructions. Drain and set aside.

In the same pot, melt 1 tbsp butter over medium heat. Add milk, cheddar, and mozzarella cheese. Stir until melted and creamy.

Mix in the cooked pasta and stir until well coated. Cover and keep warm.

  1. Cook the Chicken:

Season chicken with salt, pepper, garlic powder, and Italian seasoning.

Heat olive oil in a large skillet over medium-high heat. Cook chicken 4-5 minutes per side until golden and cooked through. Remove and set aside.

  1. Make the Sauce:

In the same skillet, lower the heat and melt butter. Add minced garlic and sauté for about 1 minute until fragrant.

Pour in heavy cream and chicken broth. Stir well and bring to a simmer.

Add Parmesan and mozzarella (if using), stir until melted and smooth. Simmer until sauce thickens slightly (3–5 minutes).

  1. Combine:

Return chicken to the skillet and spoon sauce over the top. Simmer 2–3 minutes to warm through.

Serve over or alongside the cheesy twisted pasta.

  1. Garnish & Serve:

Sprinkle with chopped parsley and extra Parmesan, if desired.

Chicken-Shaped Chocolate Cake Recipe

Got it! You’re looking for a chocolate cake that looks like a chicken—fun and whimsical, perfect for themed parties or farm-style celebrations. Here’s how you can make a “Chicken-Shaped Chocolate Cake” that both looks and tastes amazing.


Overview

  • Flavor: Moist chocolate cake with chocolate ganache or buttercream.
  • Design: Sculpted and decorated to resemble a chicken.
  • Difficulty: Moderate (requires some shaping and fondant work).

Ingredients

For the Chocolate Cake:

  • 2 ½ cups (315g) all-purpose flour
  • ¾ cup (65g) cocoa powder
  • 2 ½ tsp baking powder
  • 1 tsp baking soda
  • ½ tsp salt
  • 2 cups (400g) sugar
  • 1 cup (240ml) vegetable oil
  • 1 cup (240ml) buttermilk
  • 3 eggs
  • 2 tsp vanilla extract
  • 1 cup (240ml) hot coffee or water

For Chocolate Ganache or Buttercream (Filling + Coating):

  • 200g dark chocolate
  • 200ml heavy cream
    (or use chocolate buttercream)

For Decoration:

  • White fondant (for feathers)
  • Red fondant (for comb and wattles)
  • Yellow/orange fondant (for beak and feet)
  • Black fondant or chocolate chips (for eyes)
  • Optional: food-safe gold or brown spray for texture

Instructions

1. Bake the Cake

  • Bake in oven-safe bowls or round pans to help create the body shape.
  • You can also bake a sheet and carve the chicken shape from it.
  • Let cakes cool completely before carving.

2. Carve the Shape

  • Stack layers with ganache or buttercream in between.
  • Carve the cake into an oval or egg shape to form the chicken’s body.
  • Use smaller cake bits or cupcakes for the head if needed.
  • Chill for 30 minutes before decorating.

3. Cover and Decorate

  • Apply a crumb coat of ganache or buttercream.
  • Roll out fondant and cover the body in white fondant (or textured for feathers).
  • Use red fondant to create the comb and wattles.
  • Use yellow/orange for the beak and feet.
  • Add black fondant dots or edible pearls for eyes.
  • Optional: use a modeling tool or brush to add feather textures.

Tips for Success

  • Use a printed image of a chicken for reference while shaping.
  • You can use rice crispy treats to help form the head or wings.
  • For a “roast chicken” look, use brown cocoa-colored fondant and add a sheen with edible spray.

Tripple Chocolate Cake

Here’s a rich and decadent Triple Chocolate Cake recipe, featuring moist chocolate cake layers, creamy chocolate filling, and luscious ganache frosting. Perfect for celebrations or when you’re craving serious chocolate!


Ingredients

For the Chocolate Cake (3 Layers)
  • 2 cups (250g) all-purpose flour
  • 3/4 cup (65g) unsweetened cocoa powder
  • 2 cups (400g) granulated sugar
  • 2 tsp baking powder
  • 1 1/2 tsp baking soda
  • 1 tsp salt
  • 1 cup (240ml) buttermilk
  • 1/2 cup (120ml) vegetable oil
  • 2 large eggs
  • 2 tsp vanilla extract
  • 1 cup (240ml) hot coffee (or hot water)

For the Chocolate Filling (Milk Chocolate Ganache)
  • 200g milk chocolate, chopped
  • 100ml heavy cream

For the Chocolate Frosting (Dark Chocolate Ganache)
  • 250g dark chocolate (60–70%), chopped
  • 200ml heavy cream
  • 50g unsalted butter (optional, for gloss)

Instructions

1. Make the Cake Layers

  1. Preheat oven to 350°F (175°C). Grease and line three 8-inch (20 cm) round pans.
  2. In a large bowl, sift together flour, cocoa, sugar, baking powder, baking soda, and salt.
  3. Add buttermilk, oil, eggs, and vanilla. Mix until smooth.
  4. Gradually add hot coffee and mix until combined (batter will be thin).
  5. Divide batter evenly between pans and bake for 28–32 mins or until a toothpick comes out clean.
  6. Cool completely on a wire rack.

2. Make Milk Chocolate Filling

  1. Heat cream until just simmering. Pour over chopped milk chocolate.
  2. Let sit 1–2 mins, then stir until smooth.
  3. Chill slightly until spreadable consistency is reached.

3. Make Dark Chocolate Frosting

  1. Heat cream and pour over chopped dark chocolate.
  2. Add butter and stir until melted and smooth.
  3. Let cool until it thickens slightly for frosting.

4. Assemble

  1. Place first cake layer on a plate.
  2. Spread a layer of milk chocolate ganache filling.
  3. Repeat with second layer, then top with third cake layer.
  4. Cover entire cake with dark chocolate ganache frosting.
  5. Optional: drizzle with extra ganache, top with chocolate shavings, truffles, or cocoa nibs.

Pink Mousse Cake with Velvet and Mirror Glaze

This stunning cake is a modern mousse cake with a velvet and mirror glaze finish, often seen in French patisserie. Here’s a full recipe and guide to replicate it:


Components:

  1. Almond sponge base (or biscuit)
  2. Raspberry or strawberry mousse
  3. Insert (e.g., berry compote or vanilla cremeux – optional)
  4. Velvet spray finish & mirror glaze
  5. Heart-shaped white chocolate or mousse decorations

1. Almond Sponge Base

Ingredients:

  • 2 eggs
  • 60g almond flour
  • 60g sugar
  • 30g cake flour
  • 30g melted butter

Instructions:

  1. Preheat oven to 170°C (340°F).
  2. Whisk eggs and sugar until fluffy.
  3. Fold in almond flour, cake flour, then butter.
  4. Spread into a thin layer and bake 10–12 mins.
  5. Cut into a round matching the mousse mold base.

2. Raspberry Mousse

Ingredients:

  • 250g raspberry purée
  • 60g sugar
  • 6g gelatin (3 sheets or 2 tsp powdered)
  • 200ml heavy cream (cold, whipped)

Instructions:

  1. Heat half the purée with sugar, dissolve bloomed gelatin into it.
  2. Combine with remaining purée and cool.
  3. Fold in whipped cream gently.

3. Optional Insert: Raspberry Compote

Ingredients:

  • 150g raspberries
  • 30g sugar
  • 2g gelatin

Instructions:

  1. Cook berries and sugar, add gelatin.
  2. Pour into a smaller mold and freeze.

4. Assembly

  1. Pour half the mousse into a silicone mold.
  2. Place frozen insert (if using), then the sponge base.
  3. Freeze overnight until completely firm.

5. Mirror Glaze (Pink Side)

Ingredients:

  • 150g sugar
  • 150g glucose or corn syrup
  • 75ml water
  • 100g condensed milk
  • 150g white chocolate (chopped)
  • 10g gelatin (5 sheets or 1 tbsp powdered)
  • Pink food coloring

Instructions:

  1. Bloom gelatin.
  2. Boil sugar, glucose, and water.
  3. Add condensed milk and chocolate.
  4. Stir in gelatin and pink coloring.
  5. Cool to ~32°C (90°F) before pouring.

6. Velvet Spray (Left Side & Hearts)

Ingredients:

  • 100g white chocolate
  • 100ml cocoa butter
  • White food coloring (optional)

Instructions:

  1. Melt together and blend until smooth.
  2. Cool to ~30–32°C.
  3. Use an airbrush or spray gun to apply on frozen cake or hearts.

7. Decorations

  • Use silicone heart molds to make mousse or white chocolate hearts.
  • Freeze and spray with velvet mixture.
  • Place gently on the cake.
  • Optional: edible gold flakes on the line dividing both sides.

Chocolate Piano Cake Recipe

This beautiful piano cake is perfect for music lovers! Here’s a recipe and decorating guide to recreate it.

Chocolate Piano Cake Recipe

Ingredients

For the Cake (Chocolate Base):

  • 2 cups all-purpose flour
  • 2 cups granulated sugar
  • 3/4 cup unsweetened cocoa powder
  • 2 tsp baking soda
  • 1 tsp baking powder
  • 1 tsp salt
  • 1 cup buttermilk
  • 1/2 cup vegetable oil
  • 2 large eggs
  • 2 tsp vanilla extract
  • 1 cup hot water or coffee (for enhanced chocolate flavor)

For the Chocolate Ganache:

  • 200g dark chocolate, chopped
  • 200ml heavy cream

For the Chocolate Frosting (for piping and borders):

  • 1/2 cup butter (softened)
  • 1/2 cup unsweetened cocoa powder
  • 2 cups powdered sugar
  • 1/4 cup milk
  • 1 tsp vanilla extract

For Decoration (Piano Keys):

  • White chocolate bars (flat and rectangular for white keys)
  • Dark chocolate pieces (smaller, thinner for black keys — chocolate bars or KitKat-style work great)

Instructions

Step 1: Bake the Cake

  1. Preheat oven to 350°F (175°C). Grease and line a rectangular cake pan.
  2. In a large bowl, sift together dry ingredients.
  3. Add wet ingredients (except hot water), and mix until smooth.
  4. Stir in hot water or coffee (batter will be thin).
  5. Pour into pan and bake 30–35 mins or until a toothpick comes out clean.
  6. Let cool completely.

Step 2: Prepare Ganache

  1. Heat cream in a saucepan until simmering, pour over chopped dark chocolate.
  2. Let sit for 1–2 mins, then stir until glossy.
  3. Cool slightly, then pour over the cake for a smooth, shiny finish.

Step 3: Chocolate Frosting

  1. Beat butter and cocoa powder until smooth.
  2. Gradually add powdered sugar and milk, beating to desired consistency.
  3. Add vanilla and mix well.
  4. Use a piping bag with a star tip to pipe borders and designs.

Step 4: Decorate Piano Keys

  1. Arrange white chocolate bars evenly across the top of the cake.
  2. Cut dark chocolate bars into smaller rectangles and place them like black piano keys (in alternating groups: 2, then 3).
  3. Slightly press them into the ganache so they stay in place.

Peacock Cake & Cupcake Display Recipe

Peacock Cake & Cupcake Display Recipe

Part 1: Tiered Cake (Body of the Peacock)

Ingredients:

3 tiers of cake (e.g., 6″, 8″, 10″) – flavor of your choice (vanilla, chocolate, etc.)

Buttercream for crumb coating and filling

White fondant (for covering)

Teal and navy food coloring gel

Edible pearls or white fondant for crown

Instructions:

  1. Bake cakes and level each tier. Stack with buttercream filling.
  2. Crumb coat and chill.
  3. Cover with white fondant.
  4. Add teal ribbon and swirl designs using colored fondant or edible paint.
  5. Shape the peacock neck and head with modeling paste or fondant mixed with Tylose powder. Allow to dry and attach with dowels.
  6. Decorate with fondant feathers down the back and into the cupcake display.

Part 2: Cupcakes (Peacock Tail)

Ingredients:

Cupcakes (approx. 100+) – vanilla and chocolate mix

Buttercream frosting (white)

Fondant (blue, green, yellow, black)

Edible glue or water

Instructions:

  1. Bake cupcakes and cool.
  2. Pipe a flat swirl of white buttercream on each.
  3. Cut fondant feather shapes:

Large blue teardrop base

Smaller green, yellow, and black layers stacked to mimic an eye

  1. Assemble the fondant feathers and let them dry.
  2. Place one feather topper on each cupcake.

Assembly

  1. Place the tiered cake at the top of the table.
  2. Arrange the cupcakes in a layered pattern, fanning out to form the peacock tail.
  3. Overlap the feather shapes slightly to maintain the cohesive feather look.

“Very good! Mine took only 40 minutes, so be sure to watch it. My husband usually doesn’t like dishes like this one but he couldn’t get enough!”

This robust quiche, inspired by the Pioneer Woman, is packed with flavor from deeply caramelized onions, crispy bacon, and sharp cheddar cheese, all nestled in a flaky pie crust. It’s a satisfying dish perfect for brunch, lunch, or a light dinner.

Ingredients:

IngredientQuantity
Unbaked Pie Crust1
Yellow Onions (thinly sliced)2
Butter2 tablespoons
Bacon8 slices
Large Eggs8
Heavy Cream or Half and Half1 1/2 cups
Kosher SaltTo taste
Freshly Ground Black PepperTo taste
Sharp Cheddar Cheese (grated)2 cups
  1. Preheat oven: Preheat your oven to 400°F (200°C).
  2. Caramelize the onions: In a large skillet over medium-low heat, melt the butter. Add the thinly sliced yellow onions and cook slowly, stirring occasionally, until they are deep golden brown and caramelized. This process will take at least 15-20 minutes, so be patient. Once caramelized, remove the onions from the skillet and set them aside to cool.
  3. Cook the bacon: Cook the bacon in the same skillet until it is chewy but not overly crispy. Remove the bacon from the skillet, drain it on paper towels, and then chop it into bite-sized pieces. Set aside.
  4. Prepare the pie crust: Roll out the unbaked pie crust and carefully fit it into a pie pan.
  5. Make the quiche filling: In a large bowl, whisk together the large eggs, heavy cream (or half and half), kosher salt, and freshly ground black pepper to taste.
  6. Add fillings to egg mixture: Add the cooled caramelized onions, chopped cooked bacon, and grated sharp cheddar cheese to the egg mixture. Stir gently to combine everything evenly.
  7. Pour into crust: Pour the prepared filling into the pie crust-lined pie pan.
  8. Bake covered initially: Cover the quiche lightly with aluminum foil. Place the pie pan on a rimmed baking sheet (to catch any potential spills) and bake in the preheated oven for 45 minutes.
  9. Bake uncovered to brown: Carefully remove the foil from the quiche and continue to bake for an additional 10-15 minutes, or until the top is golden brown and the center is set (it should no longer jiggle significantly).
  10. Rest before serving: Remove the Cowboy Quiche from the oven and let it sit at room temperature for 10-15 minutes before slicing and serving. This allows the quiche to set further and makes it easier to slice.

Slice and serve this hearty Cowboy Quiche warm. Enjoy!

Church Supper Hot Dish

This hearty and easy-to-make hot dish is reminiscent of potluck favorites, featuring layers of savory ground beef, tender vegetables, creamy mushroom soup, and a satisfyingly crunchy topping. It’s a perfect dish for sharing and always a crowd-pleaser.

Ingredients:

IngredientQuantity
Ground Beef1 pound
Potatoes (peeled and sliced)2 cups
Celery (finely chopped)2 cups
Carrots (finely chopped)1/2 cup
Green Bell Peppers (finely chopped)1/4 cup
Onions (finely chopped)1/4 cup
Butter or Margarine2 tablespoons
Water1 cup
Condensed Cream of Mushroom Soup (undiluted)2 (10.75-ounce) cans
Chow Mein Noodles1 (5-ounce) can
Cheddar Cheese (shredded)1 cup
  1. Preheat oven and prepare dish: Preheat your oven to 350°F (175°C). Grease a 2-quart baking dish.
  2. Brown the beef: Brown the ground beef in a large skillet over medium heat. Once browned, remove the beef from the pan and set it aside. Drain off any excess grease.
  3. Sauté vegetables: In the same skillet, melt the butter or margarine over medium heat. Add the sliced potatoes, finely chopped celery, finely chopped carrots, finely chopped green bell peppers, and finely chopped onions. Sauté the vegetables for 5 minutes, stirring occasionally.
  4. Simmer vegetables: Pour the water over the vegetables in the skillet. Cover the skillet and let the vegetables simmer for 10 minutes, or until the potatoes are slightly tender.
  5. Combine ingredients: In a large bowl, combine the browned ground beef, the condensed cream of mushroom soup (undiluted), and the sautéed vegetables (including the liquid from the skillet). Stir well to combine all the ingredients.
  6. Layer the casserole: Line the bottom of the prepared 2-quart baking dish with half of the can of chow mein noodles. Spoon the beef and vegetable mixture evenly over the noodles.
  7. Bake covered: Cover the baking dish with aluminum foil and bake in the preheated oven for 20 minutes.
  8. Add topping and bake uncovered: Remove the foil from the baking dish. Sprinkle the shredded cheddar cheese evenly over the top of the casserole, followed by the remaining half of the can of chow mein noodles. Bake uncovered for another 10-12 minutes, or until the cheese is melted and bubbly and the chow mein noodles are golden brown and crispy.
  9. Serve: Let the hot dish sit for a few minutes before serving. Enjoy!