For decorating a wedding cake, you’ll want to start with a base of fondant or buttercream. Here’s a simple recipe for buttercream frosting that you can use:
Buttercream Frosting Recipe
Ingredients:
1 cup (2 sticks) unsalted butter, softened
4 cups powdered sugar
1/4 cup milk
1 teaspoon vanilla extract
Instructions:
Beat the Butter: In a mixing bowl, beat the softened butter on medium speed until creamy.
Add Sugar: Gradually add the powdered sugar, mixing on low speed until combined.
Add Milk and Vanilla: Pour in the milk and vanilla extract. Beat on high speed for about 3 minutes until the frosting is light and fluffy. If the frosting is too thick, add a little more milk. If it’s too thin, add more powdered sugar.
Decorating Tips:
Smooth Finish: Use a spatula or a bench scraper to create a smooth finish on the sides and top of the cake.
Piping: Use piping bags with different tips to create beautiful designs like rosettes, borders, or flowers.
Add Flowers: Fresh or sugar flowers can add an elegant touch. Just make sure they are food-safe if using real flowers.
Topper: Consider a personalized cake topper that reflects the couple’s style.
With your interest in baking, you can easily adapt this frosting for different flavors by adding cocoa powder for chocolate or citrus zest for a fresh twist. Enjoy decorating!
You can definitely use food coloring for frosting! Gel food coloring is often recommended because it provides vibrant colors without adding too much liquid to your frosting. Here’s how to do it:
Start with White Frosting: Make your buttercream frosting as usual.
Add Color: Use a toothpick to pick up a small amount of gel food coloring and mix it into the frosting. Start with a little, as you can always add more to achieve your desired shade.
Mix Well: Beat the frosting until the color is evenly distributed. You can adjust the color by adding more gel if needed.
Test the Color: Remember that the color can appear darker once the frosting is on the cake, so test it on a small amount first.
Using food coloring is a great way to personalize your wedding cake and make it visually stunning!
A DANCER with the world’s biggest breasts says they could keep growing – but insists they don’t hurt her back.
Chelsea Charms’ boobs weigh a mighty 40lbs each – the equivalent of two watermelons – and measure up at 164XXX cups.
Chelsea Charms on This Morning in 2011 Credit: ITVShe has had at least three boob jobs Credit: Instagram
She has gone under the knife at least three times, having grown up with a natural D cup.
Appearing on ITV’s This Morning in 2011, Chelsea said: “I developed early, I had my D cups all through high school and during those years I kind of covered up and was self-conscious about them being big.
“It wasn’t until I was out of high school I learned to appreciate curves.”
The 5ft 3ins dancer from Minneapolis, US, then decided she wanted huge breasts.
She added: “I didn’t plan on going this big, that just happened on its own.
“But I wanted to be big when I decided in the States I wanted to be a professional exotic dancer.”
Her first operation took her to a DD cup, with the second making her a HH cup.
Then a year and a half later, Chelsea got a polypropylene string breast implant – a procedure that has since been banned.
The implants cause her boobs – which she calls Itsy and Bitsy – to continually grow very gradually.
Polypropylene string implants slowly absorb water and expand in size when surgically inserted into the body.
They were banned in the US in 2001 and in the UK in 2010 after it was found they had been fraudulently manufactured with unapproved silicone gel and were far more likely to rupture.
Dr. Anthony Youn, a cosmetic surgeon, told NBC in 2011 that that if string implants are left in place long enough, “they can result in a massive, cartoonish enlargement” and that “will continue to grow until they eventually drag on the ground.”
Other types of extreme implants can present serious health risks and also do not last a lifetime so further surgery will be necessary.
Beshine, aka Mayra Hill, is a keen believer in “bigger is better” and she’s not yet content with having what she claims are “the biggest boobs in the universe”.
However, it’s not all plain sailing for the 5ft 6in entertainer, who has to have all of her clothes custom-made.
The 40-year-old adult model said: “I already had several store owners who wanted money from me for the tops I tried on even if I didn’t want to buy them.
“They told me after I tried them on that they were baggy and worn out.”
Meanwhile, Annie Hawkins-Turner, 66, is the owner of the largest natural breasts in the world.
The couch was purchased by the friends from a Salvation Army store in February.The Little Rebellion claims that after watching a movie, the students reported feeling crinkles in two integrated side pillows on the couch.
It had these bubble wrap envelopes, just like two or three of them, said Werkhoven, a geology major at SUNY New Paltz, to CBS News. We tore them out and were completely terrified when we saw an inch and a half of $100 bills.
In their confusion over what they had learned, the friends came dangerously close to tearing the couch apart.Once all the packages were opened, they quickly counted the cash while documenting the process with photos. Unbelievably, the total was $41,000!
‘You keep counting more and more money and you get excited, like Reese was thinking about buying a car for his mom and a boat,’ Russo, a SUNY graduate, said.
However, when they noticed that one of the envelopes bore a woman’s name, the students’ joy was replaced by moral ambiguity.
“When I discovered that notice with her name on it, the entitlement vanished very quickly.” Because we didn’t earn that money,’ said Guasti, a graduate of Mount Holyoke College.
The parents of the students assisted them in their search for the true owner of the fortune. In order to prevent theft, the parents also instructed their kids to keep the stash a secret from others.
Finally, Werkhoven’s mother located the woman in a phone book, and the boy dialed her number.
Then I say, “I found a couch,” and she responds, “Oh my God, I left a lot of money in that couch,” said Werkhoven. “I’m like, “I found something that I think is yours,” and she’s like, “What?!”
Friends of the elderly woman, who requested anonymity, claimed that she disclosed to them that her dying husband had given her a sizable sum of money so that she would have money after his passing.
She hid it under the old couch in her room because she had nowhere else to put it. She claimed to have stored her savings in the couch for thirty years. She recently underwent back surgery and spent a few months in a rehabilitation facility.
Her doctors advised her children to buy her a new couch while she was still there to help with her back pain. The Salvation Army experienced it in that manner.
According to Russo, “We almost didn’t pick that couch.”The only couch that had the correct dimensions for our living room was pretty ugly and smells.
The three individuals claimed they didn’t feel bad about doing the right thing and that they would even go out to dinner with the elderly woman and her family after returning the money to her.
Werkhoven said to CBS News, “I think it’s just that anyone can do good if they will themselves to it.”
“I believe everything went as it should, and to be honest, I don’t really think about it that much,”Added Russo.
However, the good Samaritans did not depart empty-handed. The woman shared $1,000 as a gift among the three kids!
If you were offered $20 for this couch, would you still act in the same manner?
Please SHARE this incredible story with Family and Friends!
Have you ever encountered the peculiar and somewhat bewildering scenario where you approach your vehicle only to find a penny ensconced in the door handle? This seemingly random event has left many pondering its significance or if it is merely an odd coincidence.
It transpires that this is a cunning ruse employed by car thieves. Brace yourself as we unravel the enigma of this crafty stratagem and learn how to outwit these audacious perpetrators. Fasten your seatbelts; we are about to transform into self-taught car security connoisseurs!
The Cunning Penny Gambit
You may have heard that car thieves possess an arsenal of tricks, and one of their perennial favorites involves a simple penny or nickel. These astute miscreants discreetly insert these small coins into the door handle, often opting for the passenger side.
But why the passenger door handle? Here’s the lowdown: when you attempt to use your key for central locking, it fails abysmally. Why? That seemingly innocuous penny has jammed the passenger car door, acting as a minute impediment, thwarting your attempts to secure your vehicle properly.
The Thief’s Insidious Scheme
Now, let’s delve into the intrigue. Car thieves are not your average opportunists; they harbor more nefarious intentions. While you wrestle with your key, attempting to access your vehicle, the thief might be lurking nearby, cloaked in shadows, patiently waiting for you to abandon your efforts or become distracted.
What Should You Do If You Suspect Malfeasance?
So, you might wonder, what is a resourceful car owner to do when they suspect malfeasance with their car door? Fear not; I’ve got you covered with some pragmatic tips to outmaneuver the car thief:
Scrutinize the Passenger Car Door Handle: If your key isn’t cooperating, assume the role of a detective and examine the passenger side door handle. Look for any extraneous objects, such as that devious penny, that might be obstructing the mechanism.
Remain Vigilant: Keep your senses sharp and your eyes attuned to your surroundings. If something feels amiss, trust your instincts. Don’t hesitate to seek help or call someone to accompany you to your car if you sense danger.
Avoid Immediate Returns: If your car door remains obstinately locked, resist the urge to return to it immediately. Instead, seek a well-lit, populated area and solicit assistance. Car thieves prefer to strike when you are alone or distracted.
Contact the Authorities: If you discover signs of tampering or suspect someone is meddling with your car, ensure your safety by contacting the police immediately. They are adept at handling such situations and ensuring your security.
Enhance Your Vehicle’s Security: To deter car thieves from even contemplating targeting your prized vehicle, consider implementing some anti-theft measures. An anti-theft system or a reliable steering wheel lock can provide additional layers of security, making your car far less appealing to those nefarious criminals.
The upcoming group of hopeful performers on “America’s Got Talent” season 18 is hoping to fight for the grand prize of $1 million. Returning to the star-studded judging panel as executive producer is Simon Cowell, who is joined by international superstar and fashion icon Sofia Vergara, beloved comedian Howie Mandel, and celebrated actress Heidi Klum. As host, the charismatic Terry Crews is back. Some of the strangest performers to ever grace the “AGT” stage are expected to perform this season. Here you can see trailers, highlights from entire episodes, teasers, promos, clips, and digital only content for America’s Got Talent.
“America’s Got Talent” (AGT) is a popular television talent show that premiered in 2006. Created by Simon Cowell, the show features a variety of performers, including singers, dancers, comedians, magicians, and other unique acts, competing for a chance to win a cash prize and a spot in a headline show in Las Vegas.
The format includes auditions, where contestants perform in front of a panel of judges and a live audience. Those who impress the judges advance to the next rounds, which include live performances and semi-finals. The show is known for its diverse range of talent and emotional stories, often showcasing contestants’ personal journeys.
AGT has become a cultural phenomenon, spawning international versions and numerous spin-offs. It has helped launch the careers of many performers and continues to entertain audiences with its blend of talent, drama, and inspiration.
Some notable winners from “America’s Got Talent” include:
Bianca Ryan (Season 1) – A young singer who won the first season at just 11 years old.
Terry Fator (Season 2) – A ventriloquist and impressionist who combines comedy with singing and went on to have a successful Las Vegas show.
Shin Lim (Season 13) – A magician known for his card tricks and sleight of hand, who won the title twice in different seasons.
Darci Lynne Farmer (Season 12) – A ventriloquist and singer who won at 12, captivating audiences with her talent and charm.
Kodi Lee (Season 14) – A singer and pianist who is visually impaired and blind, known for his powerful performances.
These winners have made significant impacts in their respective fields and have continued to entertain audiences beyond the show.
There have been many memorable contestants on “America’s Got Talent” who didn’t win but left a lasting impression. Some fan favorites include:
Susan Boyle (Season 3) – A singer from Scotland who became a sensation with her performance of “I Dreamed a Dream.”
Grace VanderWaal (Season 11) – A young singer-songwriter known for her original songs and ukulele playing.
Courtney Hadwin (Season 13) – A dynamic singer with a powerful voice and stage presence.
Preacher Lawson (Season 12) – A comedian known for his infectious energy and hilarious stand-up routines.
Brian Justin Crum (Season 11) – A singer who delivered emotional and powerful performances throughout the competition.
These contestants may not have won the title, but they have built successful careers and gained a strong following thanks to their time on the show.
Add some beautiful decoration to your wall with this stylish mirror. Cut the toilet paper roll into small circles, paint them in the color of your choice, and stick them to the edge of the mirror. It’s a creative and budget-friendly way to enhance your home decor.
Toy Parking Lot
To properly store your children’s cars, you’ll need a large box. Stick the toilet paper rolls in rows until the box is full. You can paint the tubes or leave them as is, creating a toy garage that keeps your child’s toy cars tidy and in one place.
Small Plant Pot
If you’re a plant and gardening enthusiast, turn a roll of toilet paper into a seed starter. The cardboard decomposes over time in the soil, making it perfect for planting. These handy seed starters will help you have a beautiful garden in no time!
Pen Pot
Use toilet paper rolls to create pen holders and save money. It’s a simple yet practical and easy-to-design masterpiece for your desk.
Natural Pen Pot
For a more natural look, find wooden twigs in your garden and stick them on the rolls. This method brings a touch of nature into your home while keeping your desk organized.
Bird Feeder
Cover the toilet paper roll with peanut butter and coat it with birdseed. Hang the roll on a tree branch in your garden, and the birds will love it. It’s a delightful way to attract feathered friends to your outdoor space.
Cable Organizer
Spool of Thread
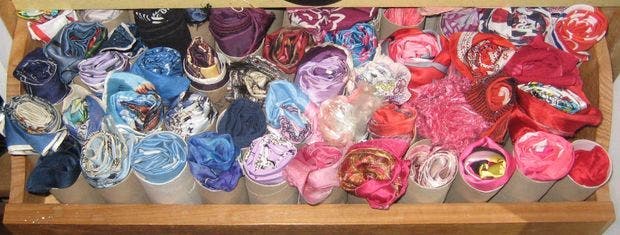
Scarf Organizer
If you have a collection of scarves, place used toilet paper rolls in your drawer and store your scarves there. This method makes storage easy and keeps your scarves visible when needed. You can also use it for ties.
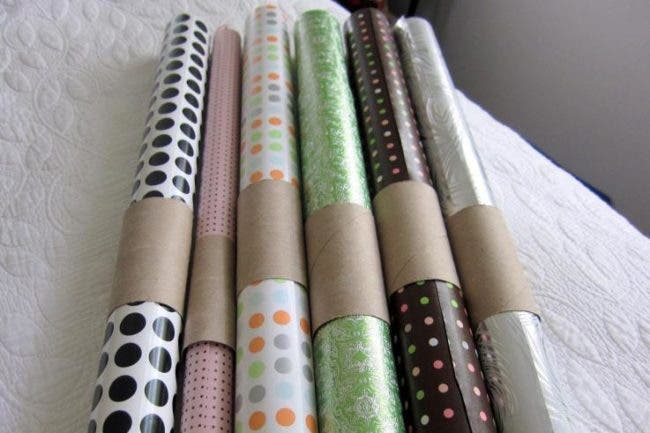
Wrapping Paper Clip
Prevent wrapping paper from unraveling after use by placing a used roll around it. This practical tip keeps your gift wrapping supplies in order.
Gift Boxes
Create small gift boxes to hold presents for your loved ones and friends using toilet paper rolls. Decorate them as you see fit, adding a personal touch to your gifts.
Castle
Engage in a craft session with your children to help them develop creativity and learn about recycling and the environment from a young age. Using scissors, glue, and colored pencils, you can create a charming princess castle from toilet paper rolls.
Ellen DeGeneres has relocated to the UK following the recent election results that will see Donald Trump become only the second president in US history to serve two non-consecutive terms.
A whole host of celebrities have been linked with moves away from the US in the wake of Trump’s victory, but it appears comedian DeGeneres is among the small few prepared to actually put her money where her mouth is, so to speak.
Reports claim the once-popular talk show host and her wife Portia de Rossi – of Arrested Development fame – have ditched their home in Montecito, California (if the area sounds familiar, that’s where Prince Harry and Meghan Markle now reside) in favor of England.
WHERE DOES ELLEN LIVE?
It’s said that the couple have chosen to move to the Cotswolds, a district located in South West England that also homes the likes of David and Victoria Beckham, actor Hugh Grant, and model Kate Moss.
DeGeneres has endured a tough few years following allegations of bullying and a toxic environment on the set of the wildly popular Ellen DeGeneres Show. The 66-year-old issued a statement on the matter in wake of the claims taking responsibility for the negative culture, but by that point significant damage had been done to her otherwise squeaky-clean image.
As of 2024, Ellen had pledged to leave show business behind following one final standup special named For Your Approval. Given that she is now retired from the industry – on paper, in any case – perhaps it’s not all that surprising to learn that she and her partner are relocating… yet the reported reason is sure to stoke the fires of controversy.
As already mentioned, Ellen’s decision to up sticks and leave the US is said to hang on the fact that Donald Trump won the recent election. TMZ claimed that DeGeneres and de Rossi had already purchased their Cotswolds home prior to the election, but a source said they wanted to “get the hell out” of American after Trump’s victory.
What’s more, an anonymous source told the Wrap that the pair will “never” return.
Ellen DeGeneres is an American comedian, actress, and television host, best known for her daytime talk show, “The Ellen DeGeneres Show,” which aired from 2003 to 2022. Born on January 26, 1958, in Metairie, Louisiana, she began her career in stand-up comedy in the early 1980s.
Ellen gained fame with her sitcom “Ellen,” which aired from 1994 to 1998. The show was notable for its portrayal of LGBTQ+ characters and themes, especially when Ellen came out as gay in 1997, making her one of the first major television stars to do so. This move was significant for LGBTQ+ representation in media.
In addition to her comedy and television work, Ellen has been involved in various philanthropic efforts and has used her platform to advocate for animal rights and LGBTQ+ issues. Her positive and humorous approach to life has made her a beloved figure in entertainment.
Throughout her career, Ellen has received numerous awards, including multiple Daytime Emmy Awards, and has been recognized for her contributions to the entertainment industry and her advocacy work.
Ellen DeGeneres, besides her notable career in comedy and television, has been involved in various projects that highlight her versatility. She has authored several books, including “My Point… And I Do Have One” and “The Funny Thing Is…,” which showcase her humor and personal anecdotes.
Her talk show, “The Ellen DeGeneres Show,” became a platform for many celebrities and everyday people to share their stories. Ellen was known for her signature dance moves, uplifting interviews, and generous giveaways, which endeared her to fans. The show also addressed social issues, including mental health awareness and LGBTQ+ rights, further solidifying her role as an advocate.
Ellen has received numerous accolades throughout her career, including the Presidential Medal of Freedom in 2016, awarded by President Barack Obama, recognizing her influence and contributions to the LGBTQ+ community and beyond.
In recent years, however, her show faced controversy related to workplace culture allegations, leading to its conclusion in 2022. Despite this, Ellen remains an influential figure in entertainment, with a lasting impact on comedy and social advocacy.
My AI currently does not provide information for events that occurred after December 2023. Please check other reliable sources for more up-to-date information.
iPhone users may see an orange dot on their screens, indicating when an app is using the microphone. This feature promotes user privacy by providing transparency about microphone access.
Key Points: Orange Dot Meaning: Signals active microphone use; normal during calls or audio apps, Green Dot: Indicates camera use; can appear with the orange dot if audio is recorded, Unexpected Appearance: If the dot shows up without an obvious reason, it may be due to a background app using the microphone. What to Do If You See It: Restart Your Device: If the dot persists after closing apps.Close Background Apps: Identify which app may be using the microphone. Adjusting Permissions: Go to Settings > Privacy to manage microphone and camera access for apps, enhancing control over privacy.
Some common iPhone battery warnings include:
Low Battery Warning: This appears when your battery level drops below a certain percentage (usually around 20%). You’ll see a notification that says “Low Battery” with an option to enable Low Power Mode.
Battery Health Notification: If your iPhone’s battery health is significantly degraded, you might receive a warning stating that your battery needs to be serviced. This can happen if your battery’s maximum capacity has dropped below 80%.
Charging Warnings: If there’s an issue with the charger or cable, you might see a message saying “This accessory may not be supported,” indicating that the charging accessory isn’t recognized.
Temperature Warning: If your iPhone gets too hot or too cold, you may see a warning that says “iPhone needs to cool down” or “iPhone needs to warm up.” This typically occurs if you’re using your phone in extreme temperatures.
Battery Percentage Warning: If you have battery percentage displayed and it drops quickly, you might notice a warning that the battery is draining faster than usual, which could indicate an app is consuming too much power.
If you see any of these warnings, it’s a good idea to take action, like charging your device or checking the battery health in settings.
To prevent your iPhone from overheating, you can follow these tips:
Avoid Direct Sunlight: Keep your iPhone out of direct sunlight, especially during hot weather. This can help prevent it from getting too warm.
Remove the Case: If you notice your iPhone getting hot while charging or using intensive apps, try removing the case to allow better airflow and cooling.
Limit Background Activity: Close apps running in the background that you’re not using. You can do this by double-tapping the home button (or swiping up from the bottom on newer models) and swiping up on the apps you want to close.
Reduce Brightness: Lowering your screen brightness or enabling Auto-Brightness can help reduce heat generation.
Disable Location Services: Turn off location services for apps that don’t need it. Go to Settings > Privacy > Location Services, and adjust the settings for each app.
Check for Software Updates: Ensure your iPhone is running the latest version of iOS. Updates often include performance improvements and bug fixes that can help with overheating issues.
Avoid Intensive Tasks: Limit the use of resource-heavy apps, especially during hot weather, as they can cause your device to heat up quickly.
Keep it Cool: If possible, place your iPhone in a cooler environment, like an air-conditioned room, especially during long usage sessions.
By following these tips, you can help keep your iPhone from overheating. If it continues to overheat despite these precautions, it might be worth checking the battery health or contacting Apple Support.
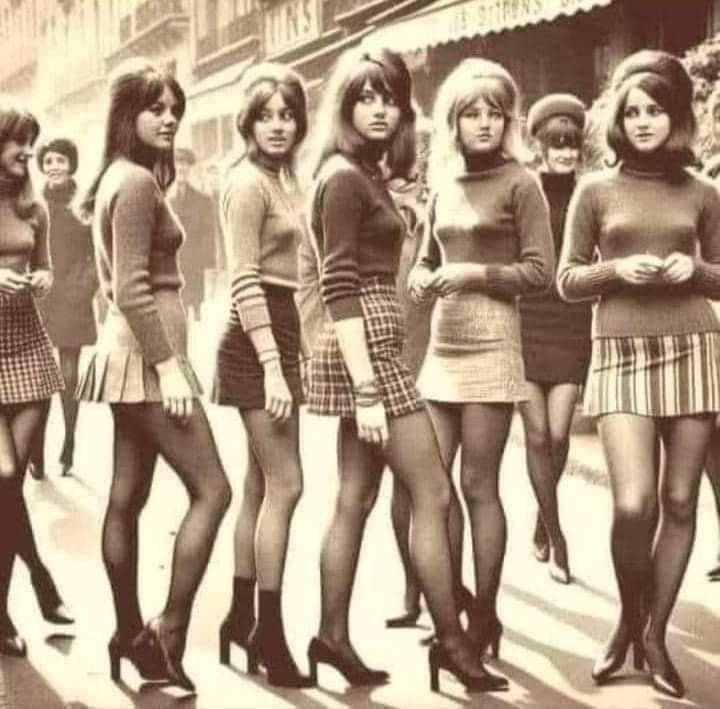
The 1970s was a transformative decade in fashion that still resonates today. With a blend of daring new ideas and retro influences, the ’70s were all about personal expression, glamour, and a distinctive sense of freedom. From tailored silhouettes to disco-inspired glitz, the fashion of the ’70s has stood the test of time, influencing designers, celebrities, and everyday wardrobes. Let’s take a closer look at the key moments and trends that defined the era and how they continue to inspire modern fashion.
Best fashion retailers
The Rise of Effortless Glamour: Tailoring Meets Comfort
In the early ’70s, fashion started to take on a new, more relaxed vibe. Unlike the structured, tight-fitting clothes of the ’50s and ’60s, the ’70s celebrated comfort without sacrificing style. The shift from formal wear to more casual, practical clothing was part of the larger cultural changes of the time. Women, in particular, began to embrace fashion that allowed them to move freely, both physically and socially.
Best fashion retailers
Best clothing retailers
Iconic Looks from Fashion Icons
The 1970s gave birth to numerous style icons whose fashion choices became synonymous with the decade. Celebrities like Diana Ross, Bianca Jagger, and Goldie Hawn became trailblazers, sporting looks that balanced glamour with ease.
Diana Ross in Bronze Satin (1970): Ross epitomized the ’70s glam in a stunning bronze satin dress, highlighting the decade’s love for flowing, figure-flattering fabrics.
Bianca Jagger at Studio 54 (1970): Jagger’s bold, metallic lamé halter dress became a signature look associated with the glitzy nightlife of Studio 54.
These women didn’t just wear clothes—they embodied an era of confidence, liberation, and style innovation.
The 1970s were undeniably the era of disco, a movement that heavily influenced fashion. Studio 54, New York’s iconic nightclub, was the epicenter of the disco craze. Women embraced glitzy dresses, metallic fabrics, and daring cuts, all designed to stand out under the vibrant lights of the dance floor. The disco look was about more than just clothes—it was an attitude. Bianca Jagger’s lamé dress, for instance, wasn’t just fashionable; it symbolized the liberation and rebellious spirit of the time.
The Birth of Sportswear and Casual Chic
While disco ruled the night, daytime fashion was shaped by the rise of sportswear. Soft, easy-to-wear separates became a staple in every woman’s wardrobe. Designers like Calvin Klein and Halston introduced clothes that were not only stylish but also practical. The rise of polyester, a fabric that was affordable and easy to maintain, made it possible for women to embrace a low-maintenance yet chic lifestyle.
Halston’s Ultrasuede Separates: Halston became a household name for his minimalist yet luxurious designs, especially his soft Ultrasuede separates, which were perfect for the modern woman on the go. Calvin Klein’s Satin Slips: Known for their minimalist elegance, Calvin Klein’s satin slips and simple jersey dresses captured the mood of a generation that favored ease over over-the-top embellishments.
These easy-to-wear garments symbolized a significant shift in fashion: comfort became just as important as style, and women no longer had to choose between practicality and elegance.
The Explosion of Denim: From Workwear to High Fashion
No fabric encapsulated the spirit of the 1970s quite like denim. Once seen primarily as workwear, denim became a symbol of rebellion and youth culture. The 1970s saw the rise of designer denim, with brands like Levi’s and Wrangler leading the way. By the middle of the decade, high-fashion designers like Calvin Klein and Gloria Vanderbilt were producing jeans, turning them into a luxury item.
Calvin Klein’s Jeans (1973): When Calvin Klein entered the denim market, it was a game-changer. His branding revolutionized the way people saw jeans, making them a must-have item in every wardrobe.
Fiorucci’s Stretch Denim: Fiorucci took denim to the next level by adding a stretch element, making jeans more comfortable and flattering for women of all shapes.
The Power of Polyester: The Fabric of the 70s
While denim was an emblem of youth culture, polyester became the fabric of the decade, prized for its affordability and low-maintenance properties. Whether in clingy separates or vibrant printed dresses, polyester made high-fashion accessible to the masses. It allowed for bold prints, bright colors, and striking textures, all while being easy to care for. Polyester Suits and Dresses: The rise of polyester allowed everyday women to wear suits and dresses that were stylish, durable, and easy to maintain. Gone were the days of ironing; polyester was wrinkle-free and machine washable—perfect for the busy woman.Despite its practicality, polyester’s synthetic nature eventually caused a backlash, but in the 1970s, it was seen as a revolutionary fabric that changed the way fashion worked.Tailoring Meets Boho: A Fusion of OppositesThe 1970s was also marked by the fusion of seemingly opposite styles. On one hand, tailored suiting became a cornerstone of professional women’s wardrobes, while on the other, the boho chic look was taking over, with flowing skirts, bell sleeves, and oversized hats.Jackie Kennedy’s Tailored Trousers (1970): Jackie O’s timeless black turtleneck and tailored trousers embodied the sophisticated side of the ’70s, showing that sharp lines and practical dressing were just as influential as the boho movement.Boho Chic with a Touch of Glam: On the other hand, models and celebrities embraced the boho look, with bell sleeves, long tunics, and flared pants becoming symbols of freedom and creativity. It was a look that celebrated individuality and personal style.Conclusion:
The Enduring Legacy of 1970s Fashion
The 1970s were more than just a decade of change in fashion. It was a decade that shaped the way we think about style, comfort, and self-expression. From disco fever to boho chic, designer denim, and tailored suits, the ’70s revolutionized fashion by making it more inclusive, versatile, and, above all, expressive of the individual’s personality.
Whether it was the glitzy nights at Studio 54 or the chic, effortless looks of everyday women, the ’70s helped define what it means to embrace fashion as an extension of self. And even now, over 40 years later, the influence of that era can still be seen on today’s runways and in our closets. So, the next time you throw on a pair of high-waisted jeans or a boho dress, you’re channeling the iconic style of a decade that will never go out of fashion.
Life is a journey filled with endless opportunities to discover something new. Whether it’s a fascinating fact, a practical skill, or an unexpected insight, each day offers a chance to expand our horizons. Embrace the joy and impact of learning something new today!
The Joy of Learning Something New
Curiosity Unleashed: Learning ignites a spark of curiosity that keeps our minds active and engaged.
A Boost of Confidence: Mastering a new skill or understanding a concept can give us a sense of accomplishment.
Building Connections: Knowledge often opens doors to deeper conversations and connections with others.
What I Learned Today
Here’s my latest discovery:
Feel free to insert your specific learning here—whether it’s a cool fact, a skill, or something thought-provoking. For example:
Did You Know? The oldest known recipe in the world is for beer! It dates back over 5,000 years to ancient Mesopotamia.
Skill Spotlight: Today, I learned how to properly sharpen a kitchen knife, and it’s a total game-changer for cooking!
Thought-Provoking Insight: Listening more and speaking less in conversations often leads to deeper understanding and connection.
How Learning Changes Us
Enhances Creativity: Every new piece of knowledge or skill can spark fresh ideas and perspectives.
Keeps Us Adaptable: In a world that’s constantly changing, learning equips us to stay flexible and resilient.
Improves Mental Health: Engaging in new activities or gaining knowledge can reduce stress and give us a sense of purpose.
How to Make Learning a Daily Habit
Ask Questions: Let curiosity guide you. Ask “why” or “how” about things that intrigue you.
Read Widely: Books, articles, and blogs are treasure troves of knowledge. Pick topics that excite you.
Try New Skills: Whether it’s cooking, crafting, or coding, hands-on learning is incredibly rewarding.
Talk to Others: Every conversation is an opportunity to learn from someone else’s experiences.
Reflect Daily: Take a moment to think about what you learned and how it might enrich your life.
The Ripple Effect of Learning
Learning doesn’t just benefit us; it impacts those around us too. Sharing new insights or teaching others helps spread knowledge, fosters deeper relationships, and inspires others to embrace their own curiosity.
Encouraging more people to share their knowledge can be approached in several ways:
Create a Safe Environment: Foster a culture where sharing ideas is welcomed and valued. This can be in classrooms, workplaces, or community groups where people feel comfortable expressing themselves without fear of judgment.
Recognize Contributions: Acknowledge and reward those who share their knowledge. This could be through verbal recognition, certificates, or even small incentives. When people feel appreciated, they are more likely to share again.
Provide Platforms for Sharing: Establish forums, workshops, or online platforms where individuals can easily share their expertise. This can include social media groups, community events, or dedicated sessions in schools and organizations.
Encourage Collaboration: Promote teamwork and collaborative projects where individuals can contribute their unique knowledge and skills. This not only benefits the group but also encourages individuals to share what they know.
Lead by Example: When leaders or influential figures share their knowledge openly, it sets a precedent for others to follow. Being transparent about learning experiences can inspire others to share their insights.
Offer Training on Communication: Sometimes, people may hesitate to share because they lack the skills to communicate effectively. Providing training on presentation and communication skills can empower individuals to share their knowledge more confidently.
By implementing these strategies, we can create a more knowledgeable and connected community where sharing becomes a natural part of the learning process.


 Tailoring Meets Boho: A Fusion of OppositesThe 1970s was also marked by the fusion of seemingly opposite styles. On one hand, tailored suiting became a cornerstone of professional women’s wardrobes, while on the other, the boho chic look was taking over, with flowing skirts, bell sleeves, and oversized hats.Jackie Kennedy’s Tailored