Toenail issues are a common cosmetic and medical concern that can affect individuals of all ages. From unsightly discoloration to painful thickening, these nail problems can significantly impact one’s quality of life. Thick toenails, in particular, can lead to discomfort, difficulty in walking, and an increased risk of infection.
Understanding the Root Cause
The thickening of toenails can stem from various factors, including:
Fungal Infections: These are the most common cause of thick, discolored, and brittle toenails.
Injury: Trauma to the nail bed can lead to thickening and deformity.
Psoriasis: This autoimmune skin condition can affect the nails, causing them to thicken and pit.
Peripheral Artery Disease (PAD): Reduced blood flow to the feet can impair nail growth and cause thickening.
The Grandma’s Secret: A Natural Approach to Thinner Toenails
My grandmother, a woman of wisdom and experience, has always had a knack for natural remedies. One of her favorite home remedies for thick toenails involves a simple and effective routine using common household ingredients.
The Magic Ingredient Trio
To replicate this age-old remedy, you’ll need:
Warm Water: Provides a soothing soak to soften the nails.
White Vinegar: A natural antifungal agent that can help combat fungal infections.
Baking Soda: A gentle exfoliant that can help remove dead skin cells and soften the nails.
A Step-by-Step Guide
Soak and Scrub: Fill a basin with warm water and add a cup of white vinegar. Soak your feet for 20-30 minutes. Gently scrub your toenails and surrounding skin with a soft-bristled brush to remove dirt and debris.
Baking Soda Paste: Create a thick paste using baking soda and a few drops of water. Apply this paste to your toenails and let it sit for 10-15 minutes.
Rinse and File: Rinse your feet thoroughly with clean water and pat them dry. Carefully file down the thickened areas of your nails using a gentle, fine-grit nail file. Avoid excessive filing, as this can damage the nail bed.
Moisturize: Finish by applying a moisturizing lotion or oil to your feet to keep the skin hydrated.
Remember: While this home remedy can be effective for mild cases of toenail thickening, it’s essential to consult a healthcare professional for persistent or severe nail problems.
Tired of the constant battle against pesky spiders, mice, and insects invading your home? Imagine a simple, natural solution that not only adds a touch of vibrant greenery to your living space but also effectively deters these unwanted intruders. The answer lies in a remarkable plant renowned for its potent pest-repelling properties. In this article, we’ll delve into the world of this extraordinary plant and explore how it can become your home’s most effective defense against common household pests.
Unveiling the Power of Mint: A Natural Pest Deterrent
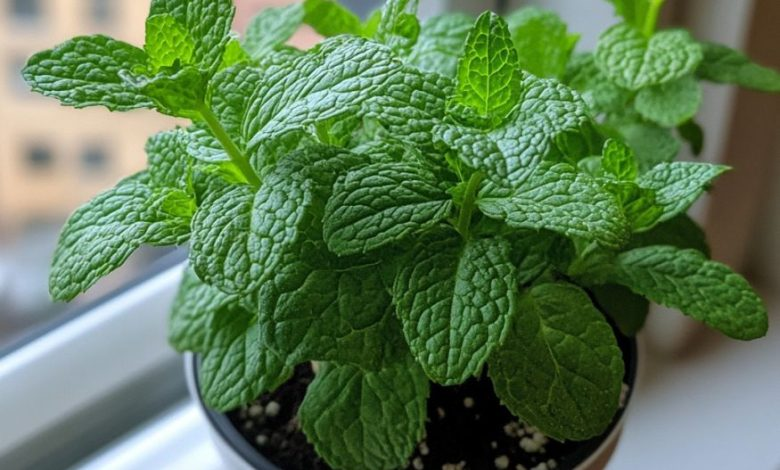
The miraculous plant we’re discussing is none other than the versatile “Mint” plant. Known scientifically as Mentha, mint belongs to the Lamiaceae family and encompasses a wide variety of species, including the popular spearmint and peppermint. These hardy perennials are beloved for their aromatic leaves, which release a refreshing and invigorating scent. Characterized by their square stems, opposite leaves, and delicate flowers, mint plants thrive in diverse climates and can be easily grown both indoors and outdoors.
The Science Behind Mint’s Pest-Repelling Abilities
The secret behind mint’s extraordinary pest-repelling capabilities lies in its potent essential oils. These oils are rich in compounds such as menthol and pulegone, which are highly effective in deterring a range of pests. The strong, pungent aroma emitted by mint is not only pleasing to humans but also incredibly repulsive to many insects, including mosquitoes, ants, and fleas. Spiders, in particular, are highly sensitive to the scent of mint and will actively avoid areas where the plant is present. Mice, with their acute sense of smell, are also known to be repelled by the strong aroma of mint, making them steer clear of areas where the plant is growing.
The Multifaceted Benefits of Growing Mint at Home
Incorporating mint plants into your home offers a multitude of advantages beyond its pest-repelling properties. Firstly, it provides a completely natural and non-toxic solution to pest control, ensuring the safety of your family, pets, and the environment. Unlike chemical repellents, which can pose potential health risks, mint offers a safe and sustainable alternative. Furthermore, mint plants are incredibly easy to grow and maintain, requiring minimal effort while contributing to improved indoor air quality and adding a delightful fragrance to your living space. This versatile plant also boasts numerous culinary uses, from flavoring beverages and dishes to creating refreshing herbal teas, making it a valuable addition to any household.
Strategic Placement and Care Tips for Optimal Pest Control
To maximize the pest-repelling benefits of mint, strategic placement is crucial. Place potted mint plants near entry points such as doors, windows, and vents to create an effective barrier against invading pests. In your garden, plant mint around the perimeter of your home to deter insects and rodents from entering your living space. Mint thrives in well-drained soil with moderate sunlight, making it suitable for both indoor and outdoor cultivation. Regular watering, adequate sunlight, and occasional pruning will ensure your mint plants remain healthy, vigorous, and highly effective in repelling pests.
Success Stories and Real-Life Testimonials
Numerous homeowners have experienced firsthand the remarkable pest-repelling benefits of mint plants. Sarah from Texas shares, “‘Ever since I placed mint plants around my windows, I’ve noticed a significant reduction in spiders and ants. It’s such a relief to find a simple and natural solution!’” Similarly, John from California states, “‘I used to struggle with mice in my garage. After planting mint around the entrance, the mice have completely disappeared. I highly recommend it!’” These testimonials underscore the effectiveness of mint as a natural and reliable pest deterrent.
Mint vs. Other Pest Control Methods: A Comparative Analysis
When compared to other conventional pest control methods, mint emerges as a clear winner. Chemical repellents, while often effective, can contain harmful substances that pose potential risks to human health and the environment. Ultrasonic devices, another popular option, can be costly and may not effectively cover large areas. In contrast, mint offers a natural, cost-effective, and eco-friendly alternative that not only repels pests but also provides numerous additional benefits.
Embracing Eco-Friendly Pest Control with Mint
By choosing mint over chemical sprays and traps, you’re actively embracing a more environmentally conscious approach to pest control. Mint plants not only deter pests but also contribute to the overall health of the ecosystem by attracting beneficial insects such as bees and butterflies. This sustainable approach promotes a harmonious balance in your home and garden while minimizing your environmental impact.
Unleash the Power of Nature
In conclusion, incorporating mint plants into your home is an effective, natural, and sustainable way to combat spiders, mice, and insects. With its potent pest-repelling properties, ease of cultivation, and numerous additional benefits, mint proves to be an invaluable ally in your ongoing battle against unwanted pests. Embrace the power of nature and enjoy a pest-free, aromatic, and healthier living environment. Remember, sometimes the most effective solutions are the simplest ones, and mint is a perfect example of nature’s remarkable ability to provide effective and sustainable pest control.
Kathleen Turner rose to fame in the 1980s with her strength and attractiveness – many consider her one of the most beautiful actresses in Hollywood.
It is this fortitude that has helped her through the many goods and bad times the actress has experienced over the years.
Kathleen Turner had a rough childhood and was raised in a family with four children. She and her siblings grew up in London and Venezuela. Tragedy befell her at a young age when her father unexpectedly passed away while mowing the lawn of their Hampstead home.
A month after his death, Kathleen and her family were kicked out of the UK by the foreign service. Turner and her family settled in Springfield, Missouri, all still grieving their father and former home.
As an adult, Tuner finally found peace after moving to New York to pursue an acting career. She had some luck on the stage – but her biggest break came when she was given the role of the femme fatale in 1981’s “Body Heat.”
Three years after starring next to William Hurt, Turner was given a chance to co-star with Michael Douglas in the famous “Romancing the Stone.” Douglas was in a rocky separation from his wife Diandra at the time of filming, and he and Turner developed some feelings for each other.
“We were in the process of falling in love – fervent, longing looks and heavy flirtation. Then Diandra came down and reminded me he was still married,” Kathleen said.
She eventually married the property developer from the film, Jay Weiss, in 1984. The two had their only daughter together soon after. Rachel Ann Weiss was born on October 14, 1987.
Unfortunately, the couple’s relationship began to fracture as they started raising their daughter.
“I’d make the movie companies give me long weekends or provide extra tickets so my daughter and husband could come to me. But there was a sense in the marriage the effort was all on his side, which made me feel guilty. It was one of the reasons it ended. I started to feel very oppressed. I thought, ‘Hang on a minute, you’ve done very well out of being married to me also,’” Kathleen explained.
In 2005, Turner starred as Martha in the Broadway revival of “Who’s Afraid of Virginia Woolf?” and it was then that their marital problems came to a head. Turner became incredibly busy while acting in eight shows a week, and it appeared that Weiss wanted no time with her when she was home.
The two divorced amicably during that time, and Turner earned a Tony award nod for her time as Martha.
The star had also earned an Oscar nomination back in 1987 for her role in “Peggy Sue Got Married.” Her film career was alive and well during the 80’s, and she starred in a variety of blockbusters–three of which were with Michael Douglas.
However, in the 90’s, Kathleen experienced a medical setback when her neck locked, not allowing her to turn her head. In addition, her hands swelled to the point where she stopped being able to use them.
“It was crippling,” Kathleen said. “You stop taking things for granted when you lose them, even temporarily. What I took for granted – my athleticism, my ability to throw myself around, and just be able to move however I wanted to. When I lost that, that was a real crisis of self: who am I if I cannot do this?”
The culprit of her misfortune wound up being rheumatoid arthritis, a condition characterized by the swelling of the lining in our joints. This condition causes chronic pain that can be difficult to manage.
“When it was first diagnosed, I was terrified because they said I’d be in a wheelchair,” Kathleen explained. “I thought, ‘If I can’t move, I can’t act.’ Acting isn’t just what I want to do. I was born to do it. It’s at every point of my living. The idea of not being able to do it was the most frightening part – that and the constant pain.”
Kathleen turned to pills and alcohol to manage her pain. While these helped her to work, the habit of drinking vodka led to her passing out during rehearsals for shows like 2002’s stage production of “The Graduate.”
The actress actually went to rehab after the show stopped running, only to find out that she was not an alcoholic. Instead, she was told she simply needed to better track when she was taking her medications and their side effects.
Today, the actress does yoga and pilates to help manage the pain and remain nimble.
While better managing her pain, the star really began to focus on her stage career. While she did still occasionally work in film and television, she returned largely to her roots as she got older, even starring in “Cat on a Hot Tin Roof” on stage in her forties.
“Because I knew that the better roles as I got older would be in theatre, which is absolutely true, so that was a little foresight on my part of which I am justly proud,” Kathleen said.s
Focusing on theatre has also allowed the star the time to focus on her passions of hers, such as volunteering at Amnesty International and working for Planned Parenthood of America.
A staunch feminist for most of her life, Turner has turned her doubtless strength to uplifting other women throughout her life. Her ideologies are represented clearly in Gloria Feldt’s 2008 memoir of the star, Send Yourself Roses.
“We are the first generation of women who are financially independent. Women are going back to work,” Kathleen said. “They’re reinventing themselves. I thought I could support that, even increase that. So it has got a lot of philosophy in it and a lot of my beliefs.”
What do you think of Kathleen Turner’s challenging but rewarding path? Let us know in the comment.
A straightforward household hack involving a sheet of aluminum foil proves to be a remarkable solution for revitalizing old cutlery. In the aftermath of a meal, the immediate washing of dishes is often preferable to avoid a daunting pile in the sink.
While dishwasher owners may escape this chore, those relying on hand washing, for various reasons, encounter the challenge of restoring old and seemingly irreversibly tarnished cutlery.
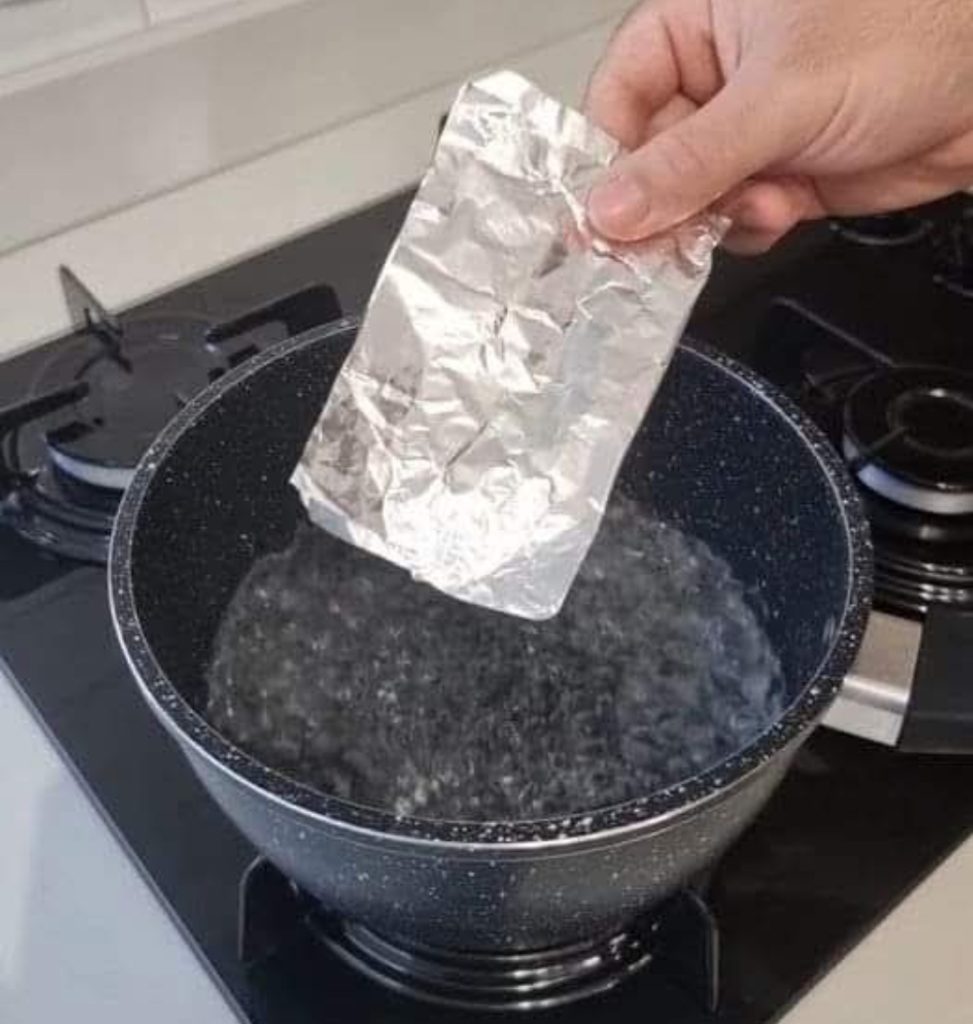
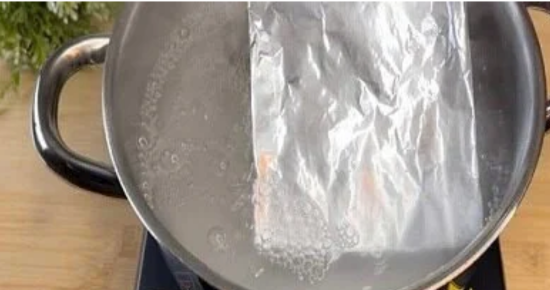
In response to this common woe, an ingenious method emerges, utilizing the transformative power of aluminum foil. The process begins by heating water in a pot, to which a spoon of sodium bicarbonate and half a spoon of sugar are added.
Once the mixture reaches a boil, a sheet of aluminum foil is cut in half, creating four equal parts. Each segment is then rolled into a ball, and these aluminum balls are introduced into the boiling pot.
Surprisingly, this method proves ideal for rejuvenating old cutlery. Spoons, forks, and knives that have lost their original luster are immersed in the pot for a mere ten minutes.
Following this brief treatment, the cutlery is removed, washed with water and soap, completing the revitalization process. The result is astonishing – the once-dull cutlery now shines brightly, almost as if brand new.
This cost-effective solution, utilizing the potential of aluminum foil and the cleansing properties of sodium bicarbonate, stands as an extraordinary alternative to discarding old cutlery and purchasing replacements.
By employing this simple yet effective method, individuals can breathe new life into their kitchen essentials, saving both money and resources. The brilliance and clarity reminiscent of the cutlery’s original state are restored through this ingenious combination of everyday items.
These cabbage and egg fritters are a healthy, quick, and easy recipe that’s perfect for any meal of the day. With simple ingredients, you can whip up these delicious fritters in no time. Great for a nutritious snack or a light meal, these fritters are sure to please everyone in the family.
Ingredients
1/2 cabbage, finely shredded
3 eggs
1 onion, finely chopped
Spring onion, chopped
Parsley, chopped
4 tablespoons flour
1/2 teaspoon black pepper
1/2 teaspoon salt
Cooking oil for frying
Directions
Prepare Cabbage: Finely shred 1/2 cabbage and place it in a large mixing bowl.
Chop Vegetables: Finely chop the onion, spring onion, and parsley. Add them to the bowl with the cabbage.
Add Eggs and Flour: Crack 3 eggs into the bowl. Add 4 tablespoons of flour.
Season: Add 1/2 teaspoon of black pepper and 1/2 teaspoon of salt. Mix everything well until all ingredients are evenly combined.
Heat Oil: Heat cooking oil in a large frying pan over medium heat.
Fry Fritters: Scoop spoonfuls of the mixture into the hot oil, flattening them slightly with a spatula. Fry until golden brown on both sides, about 3-4 minutes per side.
Drain and Serve: Remove the fritters from the pan and drain on paper towels to remove excess oil. Serve warm.
Serving Suggestions
Serve these cabbage and egg fritters with a side of sour cream, dip, or a fresh salad. They also make a great addition to a breakfast or brunch spread.
Cooking Tips
Make sure to finely shred the cabbage to ensure even cooking.
For extra flavor, you can add grated cheese or your favorite herbs and spices to the mixture.
Nutritional Benefits
These fritters are rich in vitamins and minerals from the cabbage and eggs, providing a good source of protein and fiber. They are a nutritious and satisfying option for a balanced meal.
Dietary Information
Vegetarian: This recipe is vegetarian-friendly.
Gluten-Free: Substitute the flour with a gluten-free alternative to make this recipe gluten-free.
Storage
Store any leftover fritters in an in the for up to 3 days. Reheat them in the oven or a frying pan before serving.
Ideal as party snacks or on-the-go bites, these little sandwiches combine salty ham, crunchy Ritz crackers, melting Swiss cheese, and a flavorful butter mixture. They are tasty and satisfying, perfect for any occasion.
Ingredients
Ingredient
Quantity
Ritz crackers
40
Deli ham
8 slices
Cheddar cheese (cut into pieces)
8 pieces
Butter (melted)
4 teaspoons
Dijon mustard
1/2 teaspoon
Worcestershire sauce
1 teaspoon
Garlic powder
1/2 teaspoon
Poppy seeds
2 teaspoons
Dried chopped onion
1/2 teaspoon
Directions
Preheat the Oven:
Preheat your oven to 350°F (175°C).
Prepare the Baking Sheet:
Line a baking pan with foil or parchment paper.
Prepare the Ingredients:
Cut the deli ham and Swiss cheese into quarters.
Assemble the Sandwiches:
Arrange half of the Ritz crackers on the baking sheet.
Place ham and cheese on top of each cracker, then cover with the remaining crackers.
Prepare the Butter Mixture:
In a bowl, mix together the melted butter, Worcestershire sauce, garlic powder, poppy seeds, dried chopped onion, and Dijon mustard.
Coat the Sandwiches:
Brush the butter mixture on top of the assembled sandwiches.
Bake the Sandwiches:
Bake in the preheated oven for 10-12 minutes, or until the crackers are golden and the cheese is melted.
Cool and Serve:
Let the sandwiches cool slightly before serving.
Enjoy these tasty and simple Ritz Cracker Party Sandwiches, perfect for any gathering or quick snack!
These Mexican Chicken Pinwheels are a delightful and easy-to-make appetizer or light lunch. They are packed with flavor, featuring a creamy chicken salad filling with a blend of sweet and savory ingredients. These pinwheels are perfect for potlucks, parties, or a simple snack at home.
Prepare Chicken Salad: In a large bowl, combine shredded chicken and mayonnaise.
Add Ingredients: Add green onions, minced onion, garlic salt, brown sugar, grapes, and almonds to the chicken mixture. Stir well to combine. Season with salt and pepper to taste.
Roll the Pinwheels:
Lay out one burrito tortilla on a work surface.
Spread one-quarter of the chicken salad mixture evenly across the tortilla, leaving a ½-inch border at the end.
Roll the tortilla tightly into a log.
Repeat with the remaining chicken salad and tortillas.
Chill: Wrap each rolled tortilla tightly in plastic wrap, folding the ends under to secure. Refrigerate for at least 4 hours, or preferably overnight.
Slice and Serve: Remove the plastic wrap from the chilled pinwheels. Slice each pinwheel into ½-inch pieces. Serve and enjoy!
Tips & Variations:
Spice it Up: Add a pinch of chili powder or cayenne pepper to the chicken salad for a bit of heat.
Add Veggies: Include diced bell peppers, shredded carrots, or chopped spinach to the filling for extra nutrients and crunch.
Different Cheese: Sprinkle some shredded cheddar cheese or crumbled feta cheese on top of the chicken salad before rolling.
Make Ahead: These pinwheels can be made a day or two in advance, making them perfect for meal prep or entertaining.
Enjoy these delicious and easy-to-make Mexican Chicken Pinwheels!
This recipe features a simple yet incredibly flavorful chicken seasoning that will transform your ordinary chicken into an extraordinary dish. The combination of mayonnaise, lemon, garlic, and herbs creates a unique and tangy flavor that will leave you wanting more.
Ingredients:
Ingredient
Quantity
Mayonnaise
4 tablespoons
Lemon Juice
From half a lemon
Fresh Parsley
To taste
Garlic, Chopped
3 cloves
Salt
1 tablespoon
For the Chicken Dish:
Ingredient
Quantity
Chicken Thighs
1 kg
Olive Oil
For spreading
Potato, Sliced
1
Bacon Pieces
To taste
Instructions:
Prepare the Chicken Seasoning:
In a blender, combine mayonnaise, lemon juice, parsley, garlic, and salt.
Blend until smooth and well combined.
Marinate the Chicken:
Arrange chicken thighs in a baking sheet.
Pour the seasoning over the chicken and ensure even distribution.
Cover and marinate for at least 30 minutes (or up to an hour for deeper flavor).
Prepare for Baking:
Preheat oven to 380°F (190°C).
Spread olive oil in a baking dish.
Arrange marinated chicken and sliced potatoes in the dish.
Top with bacon pieces.
Bake the Chicken:
Cover the dish with foil and bake for 1 hour.
Remove foil and bake for an additional 20 minutes until crispy and golden brown.
Serve and Enjoy:
Let the chicken rest for a few minutes.
Serve with roasted potatoes and bacon. Enjoy with a side salad or steamed vegetables.
Tips:
Adjust the amount of seasoning according to your preference.
For extra flavor, add a pinch of red pepper flakes to the seasoning.
You can use bone-in or boneless, skin-on or skinless chicken thighs.
This seasoning can also be used for other types of poultry, such as chicken breasts or drumsticks.
I hope you enjoy this delicious and easy-to-make chicken recipe!
Given the overwhelming size and outrageous global reach of the internet, one never has to look too far to find online content that shocks, stuns, amazes or disgusts.
The rise of social media sites has meant that photos and videos can be shared worldwide like never before. As a result, trends develop from time to time where there seems to be waves of similar content rolling out during a given period.
It probably shouldn’t come as a surprise that content to do with our bodies – and all the weird, wonderful, fascinating stuff it can do – has proven popular online. You’ll likely be all too familiar with videos including pimple popping (gross!), cyst draining (double gross!) and earwax removal.
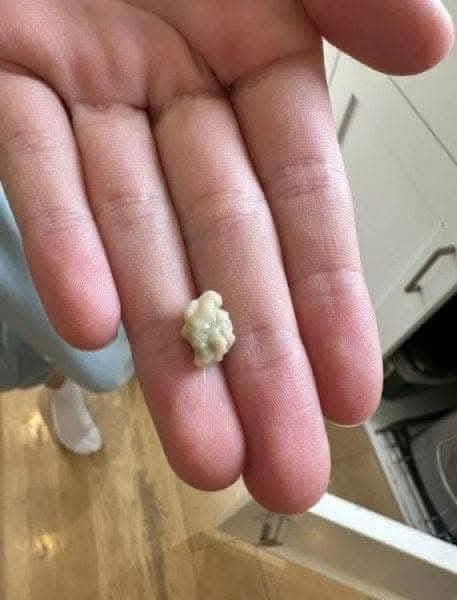
But have you ever heard of tonsil stones? I hadn’t, in any case, so when I saw a video on the subject, I decided to do what I do best… share the information with you lovely folks…
I’ll admit to having a high degree of curiosity when it comes to all things related to the human body. I don’t necessarily think they’re nice to watch, but the viral-craze of the so-dubbed “pimple popping” videos hooked me like a fish.
That said, when I came across a related video concerning the removal of “tonsil stones”, I wasn’t quite sure what to expect.
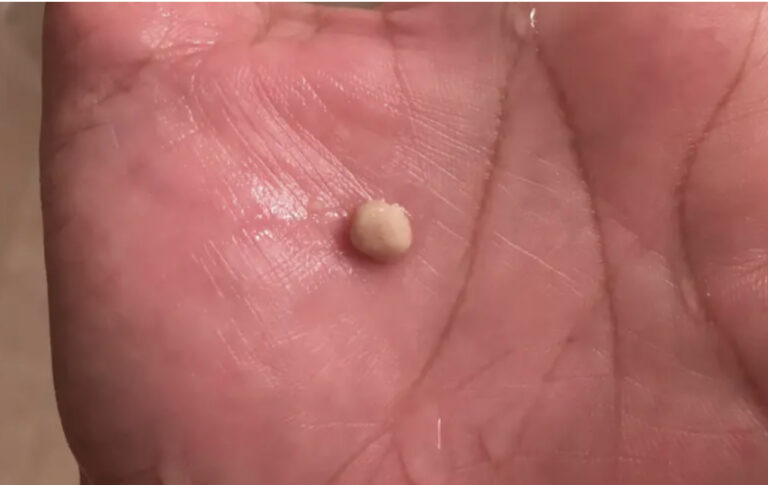
To begin with, I’d probably better tell you what exactly tonsil stones are. I hadn’t heard of them before, let alone seen one. Perhaps I’m alone in this, maybe all you readers out there are familiar with them. Then again, maybe not…
Credit / Wikimedia Commons
As per the Mayo Clinic, tonsil stones are hard white or yellow formations that occur on the tonsils. They’re neither painful nor harmful, and can usually be treated with home remedies.
The main causes of tonsil stones are trapped materials and debris in the tonsillar crypts, located in the – yep, you guessed it – tonsils, those oval-shaped, infection-fighting flaps of tissue located at the back of your throat. This can include minerals, such as calcium, food or debris, or even bacteria and fungi.
Now, tonsil stones are more common than one might think, though they don’t always cause symptoms. When they do, said symptoms can include bad breath, a cough, earache, and a sore throat, amongst others.
According to reports, 3 million Americans a year suffer from tonsil stones, but fortunately removing them is a rather easy and simple affair. In fact, a variety of home methods including gargling with salt water and using a delicate object – like a cotton swab – can be used to dislodge them.
Not only that, but simply having a strong cough can actually loosen the stones and bring them up.
Did you know tonsil stones existed? Have you ever experienced one before? Let us know in the comments.
Meanwhile, if you thought this article was interesting, check out the one below for more compelling content.
In the realm of culinary delights, few dishes offer the comforting satisfaction of savory potato and ground beef rolls. Combining the earthy goodness of potatoes with the rich flavors of seasoned ground beef, these rolls tantalize the taste buds and warm the soul. In this comprehensive guide, we delve into the art of crafting these delectable treats, exploring each step with precision and passion.